Repacking rear wheel bearings on Greenbriers, Rampsides, Corvans and Loadsides
Grease lasts about 10 years. Replacement bearings cost $300+ US each. Repack or you'll be buying some...
The front wheel bearings in your FC are just like a car's, only bigger. The rears are like an *early* car, only bigger and more expensive. Much more expensive. And not made anymore.
Check out the CORSA Corvair Basics Manual. for another version of this procedure.
My procedure for the rears is:
- jack up, remove wheel and brake drum. go ahead and jack up the whole back of the van and put two jackstands under-it makes things a little easier.
- remove the four nuts and washers holding the bearing and axle on.
- find an oil bottle cap of the right diameter to plug the hole in the side of the differential when you:
- pull the driveshaft out of the backing plate. It'll come out about a foot easily before the U joint hangs up against the swing arm. You might want to put a nut on the end of one of the wheel bearing studs to retain the brake backing plate.
- Now you have 360 degree access to the bearing, but it's all sealed up in its shell. Clean it off with brakleen and paper towels to get the brake dust and crud off. Cleaner is better, as long as you don't get dirty solvent in the bearings. We'll be washing the bearings out with clean solvent later, but there's no reason to contaminate them now.
- using a drill, dremel tool, or whatever, remove the two little rivets holding the shell of the bearing together.
- Go over everything carefully to make sure you don't have any iron filings around from the drilling.
- There's a water slinger pressed onto the axle inboard of the inboard bearing shell. Clean any loose dirt and crud off the axle nearby and out of the gap between slinger and axle. Spray the interface between the slinger and axle with PB Blaster or equivalent. Take your two largest flat-blade screwdrivers, place them opposite each other, and gently pry the slinger inboard from the bearing shell. You'll probably have to move the screwdrivers around a few times to get it broken loose. Don't worry if you bend the slinger some, it can be bent back into the right shape once it's reinstalled. Do try to avoid getting it cock-eyed, because it will grow larger than the shaft and won't re-seat properly. Once the slinger starts to come off, you change purchases with the screwdriver blades to keep it coming off. Avoid chewing up the flange on the inside of the dust cover. Don't worry too much if you mangle it a little--it can be bent back in shape after you have gotten the slinger and dust cover off. Eventually the slinger will be free of the machined part of the axle and will float freely inboard of the bearing.
- There's an outer dust cover over the top of the inboard bearing shell. It will slide off once the slinger has been removed. Once this has been slid off you can do a through job of cleaning the machined part of the axle inboard of the bearing, and cleaning any grunge out of the inside of the dust cover. Be sure to get the slinger spit-and-polish clean, too, so that it'll go easily back onto the machined part of the axle.
- Pry the two halves of the bearing shell apart. You'll have to go back and forth and walk the outer shell away from the rest of the package, or it hangs up on the outer race.
- with a little nudging and prying, you can now see far enough into the bearing to evaluate its condition. It's a normal tapered roller bearing with a spherical outer race, which allows the shaft to "wobble" around the mounting point. Be nice to the O ring - it's hard to replace and it keeps your bearings clean.
- unless everything is utterly spotless and covered with soft, pretty, fresh grease, get your paper towels and wipe away all the grease you can get at by moving the outer races around and folding the paper towel into small shapes with corners.
- spray vigorously with brakleen and continue wiping.
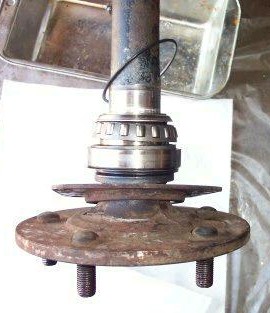
- repeat 13. You'll probably go through half a roll of cheap paper towels getting one bearing clean. It's clean when the paper towels come away white. If it's clean, it'll look like this one (photo credit: Charlie O'Hare)
- wait for all the brakleen to dry. Maybe start working on the other axle and bearing.
- get out your tub of wheel bearing grease and work it in to the bearings. Remember that the inner and outer are separate and both must be packed. Don't stuff the bearing with grease or you will get it on the brake linings. Do make sure that you get the grease worked into the gaps around the rollers under their cages. Likewise, a light smear where the rubber seals contact the shaft is a good idea.
- Work the O ring in where it goes - against the one race and between the two shells, then push the two shells back together. If everything feels greasy when you turn it but nothing oozed out anywhere, you probably have gotten it about right. Check alignment of the stud holes, remove the one nut you had holding the backing plate on, and slide the shaft back into place. You'll have to align the transmission end first, then turn it a little so that the splines engage, then turn the bearing mount plates until they slide over the studs. A little more turn-and-wiggle and all's done. Remember to put a little anti-seize on the studs before you put the nuts and washers back on. torque to specs.
- (as the manuals always say) Reassembly is the reverse of the removal process. The slinger goes on by gently tapping to and fro with a mallet. It helps to smear a little wheel bearing grease on the machined surface of the shaft--it both helps keep water out by sealing the gap between slinger and shaft, and it also makes removal easier the next time you check the bearings.
- now go around and do the other bearing the same way.
- check the trans and diff fluid while you're there. If you didn't lose any out the shaft holes the level is probably a little low.
- Now's also a great time to verify clutch adjustment, while both wheels are off the ground...
I try to do this procedure every time I have the rear end jacked up, or every three years or so.
All contents copyright their respective authors. Page © 2005 Radford Davis. All rights reserved.
Usual Disclaimer:
Any opinion, representation, or other statement you find here may or
may not be anyone else's. "Anyone else" in the prior sentence especially
includes the corporate entities TEK Systems, SARCOM, Inc., Sony and its subsidiaries, Weirton Steel
Corporation, Westinghouse Electric Corporation and its subsidiaries, North Carolina State
University, Clean Air Vehicle Technology Center, Inc., ManTech International, Inc. and its
subsidiaries, United States Environmental Protection Agency, Eastern United States Pipe
Band Association, General Motors and its subsidiaries, etc. Any belief in a connection
between any statement in this document and any individual or organization is entirely
created by the reader.